
We have been on our farm for a little over 2 years now. This entire time I have been using my horse trailer as my tack-up station (not that I was riding much so it didn’t really matter). I have high hopes of building my dream barn someday (once prices come WAY down again – which may or may not ever happen). But in the interim, we (my boyfriend Steve and I) finally bit the bullet and renovated/upgraded these 2 little tack closet things my barn had because I am finally starting to actually ride my horses; and climbing in/out of the trailer was obnoxious (thanks a lot legs), and actually finding what I was looking for was even more obnoxious.
The Before
When I tell you these tack rooms were horrifying, it is not an understatement. The barn was built in the 1970’s and from what I can tell was never really renovated. And it sat unused for years before we bought the place. The little tack closet room was ok as far as tack closets go – except for the fact there was mouse poop and insulation everywhere and it STUNK. Plus I have too much stuff for it to have been useable. The other one looked like it should have been a bathroom from a horror movie, but there was no toilet or sink, and TBH I have no idea what it was used for.

During the Upgrade / Renovation
To try and draw a picture for you: in total, this space is about 4ft x 11ft. And it is really better used as an alcove VS a boxed in room with a door, to get the organization I was hoping for.
First steps: tear down existing walls, remove poopy insulation, remove all dead things and remnants of dead things in the walls and falling out of the walls, sweep, disinfect, disinfect myself, drink wine, and have nightmares.


Second Step: Measure the space, then go to Lowes and pick up the materials needed to do the walls/floor.
- I decided on a lovely waterproof luxury vinyl plank flooring that already had padding and it was on sale for $2.49/sqft when I bought it, it is called Charleston Oak by ProCore Surfaces.
- I wanted white walls, but wanted something more fun than just drywall. I went with a beadboard panel as it is a classy/timeless look.
- Then we needed trim for all the corners and where the walls met the floor.
- Plus paint and nails/etc.
Third Step: Install the beadboard.
- We installed the beadboard on the walls first. Since the 2 short sides only needed 1 piece each (and needed a little trimming) we started with those. Then we did the larger back wall. And finally did the ceiling. We were sure to trim the ceiling piece and match it up so that the lines from the sides went perfectly into the lines of the ceiling (can we say anal retentive?).
- We also marked all the studs and drilled holes for my saddle racks, bridle hooks, and saddle pad rods at this stage to avoid messing up the soon to be pretty new paint job.


Fourth Step: Install the floor. I wasn’t sure which way I wanted the flooring laid until we put some on the ground. Originally Steve thought to do it long ways the width of the room. But after trying it both ways, it made for less cutting and a more impressive installation (to me anyways) to do it the opposite way.


Fifth through Seventh Steps: Install all the trim, caulk all trim seams plus panel seams, and then paint.


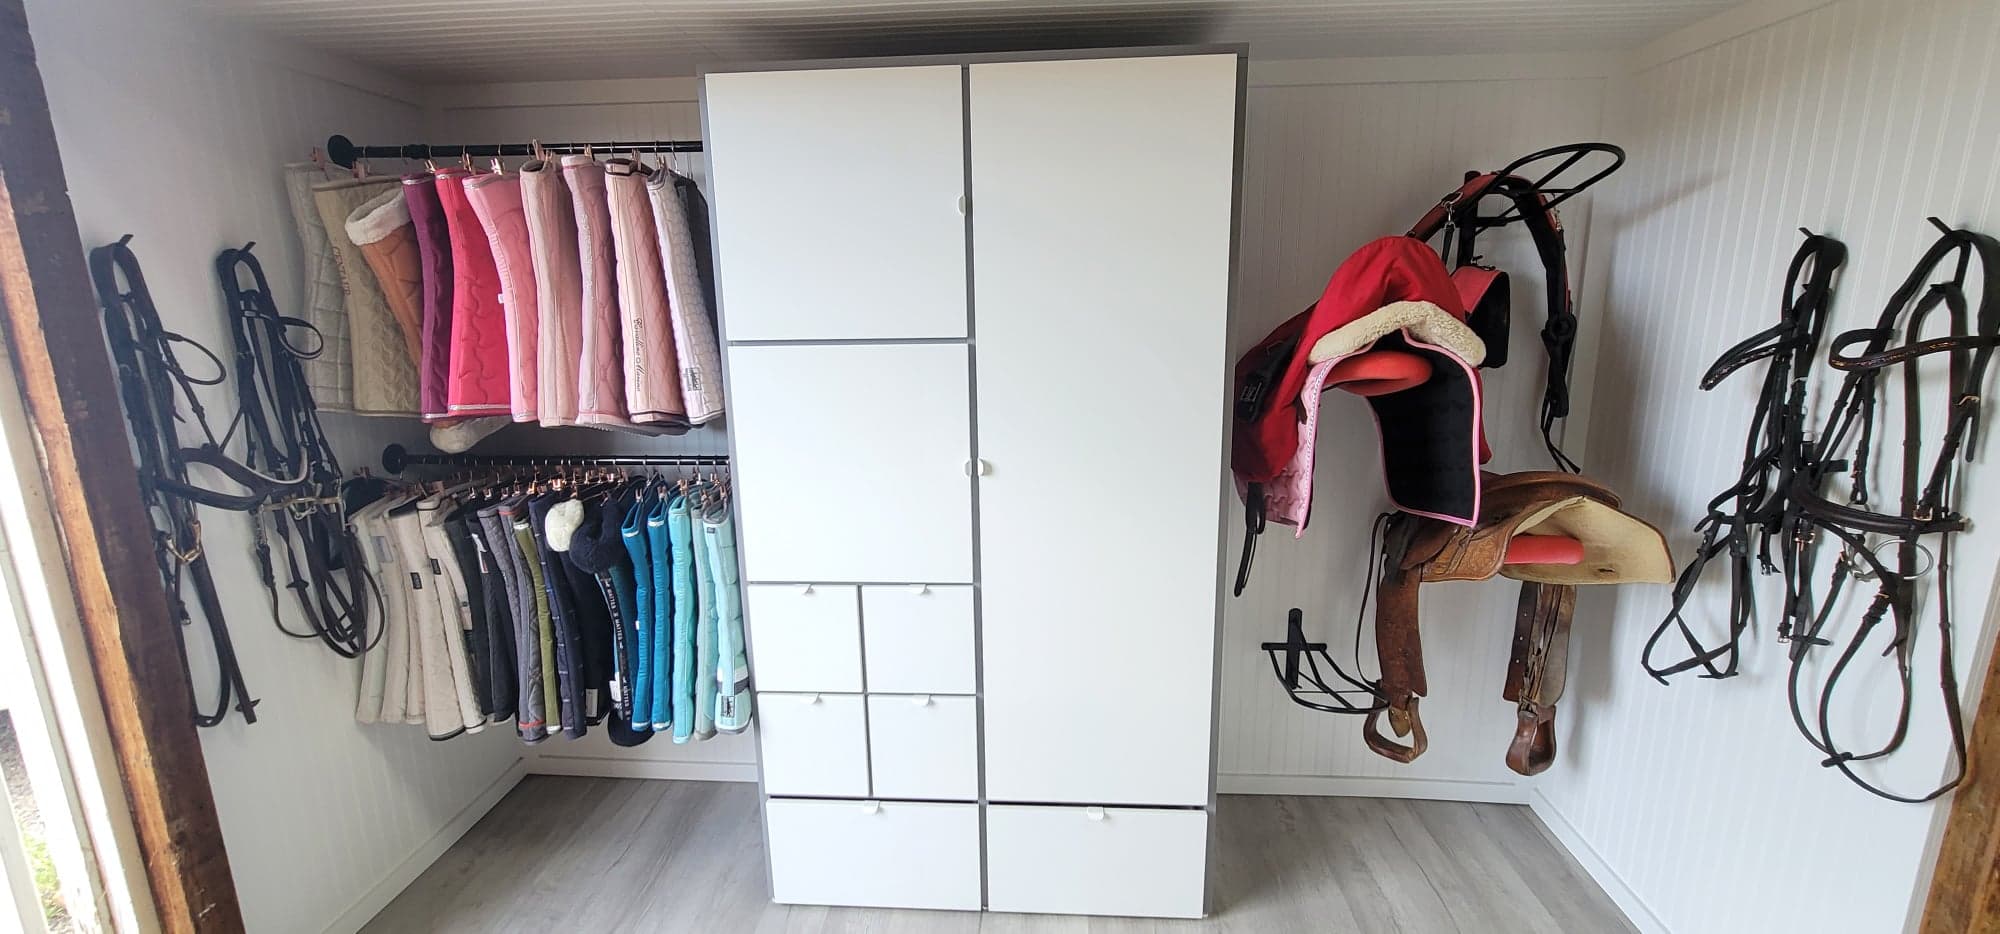
Eighth Step: Now the fun really starts. Saddle pad hangers, saddle racks, and bridle hooks. I was going for the Modern Farmhouse look.
- I had a vision for my saddle pad hangers, and we ended up having to build them from scratch because no *off the rack* options were the right sizes to go into the studs. And I have a healthy saddle pad collection, so it needed to be a solid mount. As I mentioned before, we already had everything drilled for this step and had the racks set up and test fit. Now we just had to paint the racks, and finish mounting them. We used steel gas pipe from Lowe’s to build these. All the pieces just screw into each other.
- I got the saddle racks from Big Dee: https://amzn.to/3nq1PYg
- I got the bridle hooks from Amazon: https://amzn.to/3ytkUyQ


Ninth Step: Put together the most amazing wardrobe cabinet ever (note: putting it together was not my favorite). For the price ($349) and size, this was the best bang for it’s buck. Plus it fit my color theme perfectly AND has loads of drawers and shelves to organize until my hearts desire. It is the IKEA Visthus Cabinet: https://www.ikea.com/us/en/p/visthus-wardrobe-gray-white-20392337/
Tenth Step: Organize and Admire!
- I used pool noodles (from Dollar Tree), with a slice down one side, to cover my saddle racks to make it gentler on my saddle’s padding/tree.
- I got the cutest rose gold saddle pad hangers (pants hangers) from Amazon: https://amzn.to/3boYsxQ


And finally – THE FINISHED PRODUCT!!! To say I am in love with my little tack room/alcove is an understatement. I still haven’t finished organizing everything yet, but this gives you a good idea in regards to what a huge (and relatively inexpensive) transformation you can make with a small tack area.


Leave a Reply